Tuesday, October 16, 2012

'My Color' inspired by Pantone-Pantone Painting Party

Welcome!

If  you are new to Paper Princess Studio I welcome you and I'm so glad you stopped by. Today I'm excited to take part in 'My Color' inspired by Pantone fall painting party.

What is a painting party you may ask? It's a PAR-TAY where you hop from blog to blog and get to see some fun projects created by DIY folk just like yourself. Here is what I created using the paint I selected from Pantone:

Yes, I know Halloween is nearly a week away and I'm already working on Christmas! That's how I roll ;) 

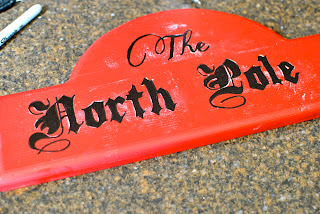
To create this 'North Pole' sign I used a few fun techniques that I thought I would share with you today.

To begin with, I painted the base of my sign and piece with Rio Red and Seedpearl paints by My Color from Pantone. After letting it cure, I got to work with creating the lettering which in my opinion is what really makes this sign (besides the great color from Pantone ;) To duplicate this intricate font I followed these simple steps:
1. Selected a font from my font file on my computer and then printed it out to size. Once the sheet was printed, I flipped it over and simply rubbed chalk all over the back of the sheet.

2. Once the chalk was applied, I flipped it over (font side up) and then taped it into place where I wanted it on my piece. I then burnished it by simply tracing over the letters with a ball point pen.

3. Once you trace over the letters and lift up the sheet you are then left with a perfect impression of  your letters onto your piece. It is at this point that you can either paint your  letters or use a sharpie to fill them in :) Yes, I did say sharpie. In fact, the sharpie version is what you see on both of the pieces I created today (who knew, right?)

Once my lettering was in place, it was time to embellish. Because the N.Pole is whether freezing and well, I live in AZ I figured some faux snow was in order. To do this, I simply dipped an old tooth brush into some diluted paint and then simply rubbed my finger back and forth across the bristles to splatter snow into place.

The snow technique certainly added to the ambiance of the piece but it was still missing something so that is when I resorted to Snow Tech. for some 3 dimensional snow effects.

I couldn't just stop with a N.Pole sign (although it will be the perfect addition to add to our N.Pole breakfast, and Elf on the Shelf party this year) so I decided to pull out all the stops and create a N.Pole inspired mailbox to  match.

 My lil' sweets is only 2.5 this year so she still wont be writing a letter to Santa but hey, at least when she does get to that age I will be well prepared for the perfect photo op as she slips her letter into this vintage inspired Letter to Santa Mailbox.

 I figured until she can drop off a letter to the big man himself this will at least make a cute place to leave goodies from her Elf on The Shelf buddy, ChooChoo and or the big man, S. Claus during the month of December.

I used the same lettering technique as talked about above to create the 'North Pole Express' on the side of the box.

On the other side of the box I added a genuine N.Pole postage stamp to the flag


And then finished it off with 'Dash away Delivery service' added to the back panel :)


I hope that you have been inspired today here at Paper Princess. I thank you for stopping by and invite you to come back soon for many more crafts and projects to lift and inspire

If you’d like a chance to win a sample of MyColor™ inspired by Pantone® for your own project, simply comment on my post and share how you’d use MyColor™ inspired by Pantone® in your next project! Feel free to comment on the other blogs in the party too – they’ll all be giving away samples! For a second chance to win, tweet your project ideas to @MyColorPaints using hashtag #PassItOn. Also check out and like the MyColor™ inspired by Pantone® Facebook page to get access to the schedule for today’s parties as well as the rest of the parties going on this month! Share your project ideas there for one more chance to win!
  
MyColor™ inspired by Pantone® reached out to me to participate in the MyColor™ inspired by Pantone® Painting Party. My post represents my honest experience with MyColor™ inspired by Pantone® paint. I am not being paid for my answers, but I did receive MyColor™ inspired by Pantone® paint to use for this project.

Here is a list of the other participants in this weeks party: Make sure to stop by everyone's blog for more inspiring projects using Pantone Paint.

  1. Courtney @ A Thoughtful Place
  2. PJ @ Blog-A-Dazzle
  3. Cassie @ Primitive and Proper
  4. Holly @ Life in the Fun Lane
  5. Angela @ Number Fifty-Three    

Monday, October 15, 2012

Halloween mantle 'Boo-ified'

I've always been at a lost as to what to do to make our mantle 'BOO-tiful' during the Halloween season but this year I think I am quite happy with what I conjured up :)


 I don't care to go 'scary' for our Halloween decor in our home so that left me with pumpkins galore, crows, and a few bats here and there (that's as scary as I go here). I added all of those elements in with our framed chalkboard (my FAVORITE decor element in our family room :) :) and within a matter of minutes our mantle was transformed into a festive Halloween focal point in our home.


I had planned on creating a burlap Halloween banner to hang across the mantle but I decided to go a bit simpler and chic by just adding black burlap ribbon combined with tea stained gauze and then finished off with branches and a few other Halloween themed 'naturals'. I adore the way it looks...fun, festive, and just a tad bit spooky.
Of course the spook-ified set up would not be complete without a MonMell Designs pillow thrown in!

How do you make your house 'BOO-tiful' this time of year?

Thursday, October 11, 2012

Trick-Or-Treat

There's no trick about this lil' treat


My friend and business partner, Stephanie, of MonMell Designs decided we had to create something fun, different, and well MonMell'ish for our front doors for the Halloween season. Our solution was this little sweet treat


The text on the bottom reads, "Serving all treats, no tricks"

We both adore the way they dress up our porches- thinking we might add these to our MonMell shop very soon ;) Hint, hint, hint...

Wednesday, October 10, 2012

Counting down

Wow, Is it really October already?!!!

Where on earth does the time go? Well, those of you who know me well know that I am a HUGE holiday girl. I love decorating for any and every holiday (well most holidays) and Halloween is no exception. In the days and weeks ahead, I plan on sharing some of my favorite ways to dress up our home before the littles dress up and trick or treat.

Do your little ones anticipate the day that they can march around your neighborhood collecting candy? My sweet princess is still a tad bit little to understand that Halloween means you get to load up on lot's and lot's of candy but we're counting down the days never the less.

This is a vintage inspired countdown I created last year.


And this is a fun countdown I just couldn't resist when I saw it at TJ Maxx the other day :) How fun is this...My sweetness moves the key in the key holes counting down the days until Trick Or Treating :)

Do you countdown to Halloween?


Wednesday, July 25, 2012

Yee Haw our lil' cowgirl is 2!!

Our lil' cowgirl turned 2 6 months ago!!
Pathetic that I'm just now getting around to writing this post and sharing but I guess better late then never, right? Well, without further a do here are the dets of our rhinestone cowgirl birthday bash

  The Invite
 I created the invite to be tucked inside a hand sewn burlap pouch finished off with a crepe paper medallion and a vintage bow. Once the invite was pulled out of the pouch the most AH-dorable pic. of our lil' cowgirl greeted the guest. We had my friend Gail of G.Miya Photography snap a few western themed pics. of M when she shot our family pics. last year...they couldn't have been more perfect!! I love including a shot of the birthday girl in the invite so I always design her party invitations to do just that. Sewn to the back of the photo were all the party details a la western style subway art theme.
Invitations are available in my shop Paper Princess Studio

  The Decor
Decor included all things rhinestone cowgirl to include handmade banners. I had banners strung all across our covered patio and I loved the way it added to the party atmosphere. I created bandanna and horse shoe pendent banners along with a lace doily and photo banner...SO fun!
Since I'm co-owner of MonMell Designs some custom themed pillows were a must!


The Food
Oh my, The FOOD!!! You see, my dear friend Shannon and I had worked out one sweet deal and my end of the deal was I got M's party catered by the most fabulous B.BQ joint in AZ, Honey Bear B.Bq. Food included; Rodeo Ribs, Cowgirl Clucks(shredded b.bq chicken sandwiches), Rootin' Tootin' Baked Beans, Cowboy Slaw, and good ol' corn on the cob. To say the food was delicious would be an understatement...it was down right FABULOUS!!! Besides the delicious grub, the food table was also where the guest grabbed their pie tin plates, and handmade 'Chow Time' Cutlery utensil bags; besides the necessities the bags also included a wet wipe so that our guest could wipe their hands after eating the finger lickin' good B.bq!


 Cowgirl Candy Corral
What party is complete now a days without a candy buffet?!! The buckaroos at our bash could find all things sweet and savory at the Cowgirl Candy Corral
Loot included: *Cowgirl Cakes (Cupcakes made by my sweet friend Cassie of Cakes by Cassie) *Bandanna wrapped mints *Licorice Lassos *Cinnamon Disk *Marshmallow push pops * Ol' fashioned swirl lollies * Cowgirl Corn (Candy corn served out of a chicken feeder) *Kettle corn * Salt water taffy I included some hand made loot bags so the buckaroos could place their loot inside and take it home with them.


 Happy Trails Trail Mix Bar
For the more 'mature' cowfolk we had the 'Happy Trails Trail Mix' station. It was here that guest could create their own trail mix from staples such as:
*Chex  *Peanuts  *Dried Cranberries  *Raisins  *Pretzels  *Cowgirl Chocolates  *Sunflower Seeds
*M & M's 
Bandanna print scalloped boxes were provided for the guest to put their mix in. 


The Watering Hole
With all the grub our guest were sure to have a need to wet their whistle so the watering hole is where they could do just that.
Guest were served: *Sweet Tea in mason jars *Root beer in jute wrapped bottles *And a variety of milk (strawberry/Chocolate/2%) for the lil' cowfolk

 Cowgirl Grins & Cowboy Staches Photo Booth
 Photo booths are a hot commodity at parties these days so adding one to M's party was a necessity
I loved having the photo booth but truth be told you have to be REALLY organized for it to run well. Thankfully my partner in crime, Steph, was my photog for the day so she made sure to grab pics. of the guest with the photo props..thanks a million Steph!

 Pony Corral
 What would a cowgirl bash be without a pony corral?!! Guest grabbed a pony and gitty up


Pony Up Cowgirl/boy Gear The lil' buckaroos were all encouraged to dress the part so to assist them we provided Cowboy hats, bandannas and badges


Cowgirl Glam Dress Up
Because this was not just a cowgirl/boy themed celebration but rather a rhinestone cowgirl bash some cowgirl glam was in order for all the girlie's
Here the girlie's found *Candy Necklaces *Candy Rings *Pearl beads *and other girlie glitz and glam

Buckaroo Barn 
For the party table we rented a toddler sized banquet table and bought some hay bails for the buckaroos to sit on. LOVED the hay idea but boy was it messy!! Much thanks to the hub for dealing with all my crazy party concepts..xoxoxo! Decor on the table included a checkered table cloth, a cute lil' center piece with the cowgirl of honors pics. in it, bubbles for the buckaroos, and a special b.day chair for the guest of honor
One of my fav. concepts I came up with for this party was the personalized burlap and chalk cloth place mats I created for each guest. I knew I wanted to incorporate burlap and chalk cloth but I just wasn't sure how..the place mats are what I came up with and I love them!! Not only did it provide seating arrangements but was also an activity that kept the buckaroos busy as they could doodle on their chalkcloth place mat and then also take it home with them as a favor. SO FUN!!

 The Favors
 My mama helped me create the favors by baking up a batch of photo cookies with M's cowgirl pic. Words can not describe how precious the cookies turned out! The cookies were packaged up in cello bags with a lace doily topper finished off with a raffia bow- a special thank you note was included inside.
I love the cookies so much that here it is 6 months later and I still have mine! I just don't have the heart to eat it because it is that precious to me ;)

 Fun Times 
We are so blessed by all of our family, friends, and neighbors who came by to celebrate M's 2nd Birthday- much thanks to ya'all!!

As you can see, A LOT of time, preparation, and heart went into planning this party but frankly, I wouldn't have it any other way! Makayla is such a precious gift to our family and is a miracle in every since of the word. Besides, seeing this precious smile makes every lil' second of time and preparation more then worth it!
I love you more then words can express my sweet baby girl- xoxoxo, Mama

Tuesday, July 17, 2012

Lil' Man Baby Shower

WOW...Has it really been over 3 months since my last post?!!! I've received a few emails from blogging friends asking if everything is ok & well, truth be told it couldn't be better :)! I've been on a blogging hiatus because I've been getting A TON of projects done around my home. I was also keeping super busy with my Etsy shop so for the time being I've decided to take a short break from that as well. With a crazy 2 year old toddler it is quite difficult now a days to find time to do it all. I do hope to be more diligent in updating this blog so here's to hoping that actually pans out. Anyhow, a couple months back I co-hosted a baby shower for my sweet friend from church and I thought I would share some pics :) This is my friends 3rd. sweet baby boy so we thought a Little Man mustache bash must be in order to celebrate. This is the invite I designed- complete with a mustache on a stick :) SO fun designing these and I couldn't be more tickled at how they turned out
Once the invites were created I continued to play off the mustache/Lil' Man theme for the other decor to include: A Party Banner
Drink wrap labels
Drink embellishments
Cupcake toppers
And a few other 'party essentials'. Once the invite and printable decor were created it was time to add in some lil' man sweet treats to include: Onsie tie sugar cookies
Cookies & Milk with a mustache embellished straw
Chocolate donut skewers complete with coordinating bow ties
Some other fun touches we added included: Chalkboard mustache labels for the hot beverage mugs
Baby wish cards (cards I pre-printed that had prompts for the guest to fill in the blanks. At the end of the shower we collected them from the guest and tucked them inside a momento box I made for baby Hudson.)
and last but certainly not least mustache photo props!!!
I know what the important questions is, Did I actually take my mug with a stache?? I'm happy to report that YES, both myself and the other co-host took part in the mug sessions with the staches :)
All in all, I think the mama to be had a wonderful time
I know that we sure did :)! I still have a few other goodies to share from the shower- hope to share those by the end of the week so stay tuned